The easiest way to install Nextcloud server is to host your cloud with CiviHosting — we will do it for you. For more information, see our Nextcloud hosting page. 🙂
But if you don’t host with us, or you just prefer to do it yourself, there are two steps:
- Get the files onto your account
- Install Nextcloud
Get the files onto your account
There are two methods to get the Nextcloud files onto your account:
- Via the Web Installer
- Manually
You can use whichever method you prefer — the end result is the same.
Load Files Via the Web Installer
To get the Web Installer, right click on this link: setup-nextcloud.php and save that file; it will be called setup-nextcloud.php.
Next, upload file to your hosting account. With CiviHosting, you can use the File Manager tab of the hosting Control Panel to upload this file.
Now visit the URL of that file in your browser, meaning browse to
http://mysite.com/setup-nextcloud.php and you will see the Nextcloud setup wizard:

Click “Next” and enter a directory if you want and click “Next” again.
You may need to wait a bit now as the installer fetches all the files from Nextcloud’s servers. When it finishes, you will see a message “Success — Nextcloud is now installed” with another “Next” button.
Click that button and then jump below to the “Install Nextcloud” section.
Load Files Manually
To get the files manually, visit https://nextcloud.com/install/#instructions-server and click “Download Nextcloud” and save the zip file on your PC.
Upload that via FTP to your hosting account.
Unzip the file. On CiviHosting, you can simply find the file in the File Manager tab of the hosting Control Panel and click on it and the Control Panel will unzip it for you.
Now visit the URL to where you put the files. If you put them in the main area of your account, then the URL would be http://mysite.com/ or perhaps http://mysite.com/nextcloud.
Now the files are in place and you can proceed to the next step.
Install Nextcloud
After finishing the above step, you should be looking at the Finish Setup screen:
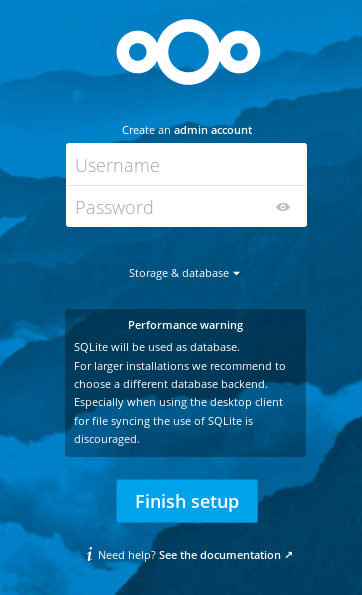
While it’s a bit tempting to just click “Finish setup,” we don’t recommend that as it will use SQLite for the DB server and that’s only a smart choice for very simple sites. For any normal use, you could click on “Storage & database” and then click on “MySQL/MariaDB.”
When you do that, you will see boxes to enter the Database user, password and name. You must create a database (or ask your host to) and this process is different on every host. With CiviHosting, just visit the MySQL Databases tab of the hosting Control Panel and you can create a database there. You can then use the name and password of your Control Panel login or you can create a different user and password on the same page.
Once those are ready, enter them into the boxes on the Nextcloud Finish setup page and then at the top of the page, enter your desired username and password — this will be the admin user for Nextcloud and you can use whatever password you want.
Click the “Finish setup” button, watch Nextcloud do its thing and that’s it. Your cloud is ready to use!
For details how to install the Nextcloud client, see our How to Install Nextcloud Client post.
Hosting
And if you’re looking for hosting for Nextcloud, whether in the USA or Europe, we are here for you. Get started now and we install and secure Nextcloud for you:
Note that for advanced, geeky users, it is also possible to install Nextcloud from the Linux command line. See here https://docs.nextcloud.com/server/12/admin_manual/installation/command_line_installation.html for more details.